Have you started to plan your Christmas Dinner menu?
I don’t know how it plays out at your house, but we start grazing on appetizers mid-afternoon, enjoy a sit-down meal, then open more presents while enjoying dessert.
It’s a long, delicious day of family and food!
What I’m Serving For Christmas Dinner
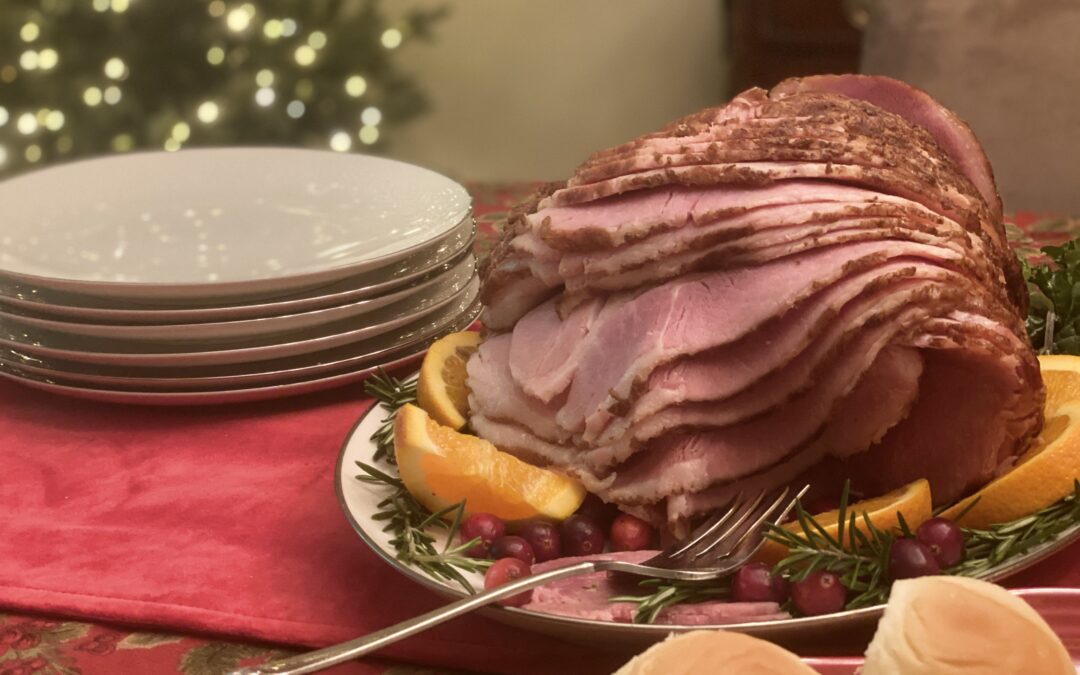
The center of attention for this year’s Christmas dinner is going to be a spiral-sliced ham from Berkwood Farms. You can check it out HERE.
Berkwood Farms is a Co-Op of pig farmers in the midwest. These are family farms—some 2nd, 3rd, 4th, or even 5th generation, that raise the heirloom Berkshire pigs.
Berkshire Pork is the oldest breed of pork in existence today. It’s raised for the meat’s distinctive color and marbling—two characteristics that make the pork tender, juicy, and flavorful every time.
I’ve always loved serving ham for holiday dinners, and I’ve tried many different spiral sliced hams from every major brand you can name.
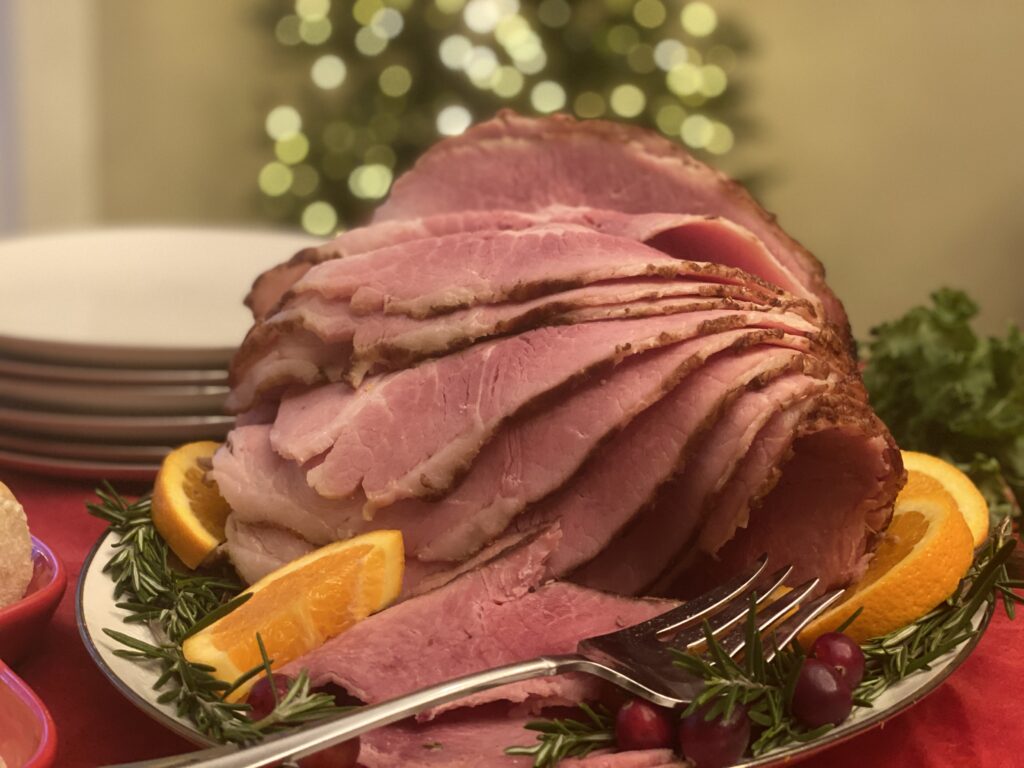
But Berkshire Farms ham is special. It comes in a gold foil wrap and it’s glazed with a subtle honey glaze. It’s also uncured, meaning it isn’t injected with chemical brines, smoke, or flavorings.
What I notice most when eating it is that the ham is tender, juicy, and flavorful… but not SALTY!
While trimmed, there is still a little fat around the edges to melt into the ham as it heats (just thaw, heat, and serve… it’s already cooked when it arrives!). My family agrees that it’s the best spiral ham we’ve ever had.
If you’re interested in learning more about this ham, you can click HERE.
A Few Snacks Before Christmas Dinner
We are a family that loves appetizers!
I don’t know about you, but I could eat any kind of appetizer-type food every day if I had to.
Charcuterie boards are one of my favorite appetizers to make (just a fancy way to describe a meat and cheese tray).
There aren’t really any steadfast rules when it comes to putting boards together, but I’ve found a few ways to make sure there is a balance of flavors and textures. You’ll find my tips in the video below!

And as much as I love a good “board,” my daughter, Kylie, is the queen of DIPS! She loves when I make a creamy, gooey dip for a party or gathering.
Sausage Dip is a family favorite, but I actually have a way to lighten it up with fewer calories and fat without sacrificing any of the flavors!
I really like this served with cut-up mini sweet peppers and cucumbers, but crunchy tortilla chips are usually chip of choice.
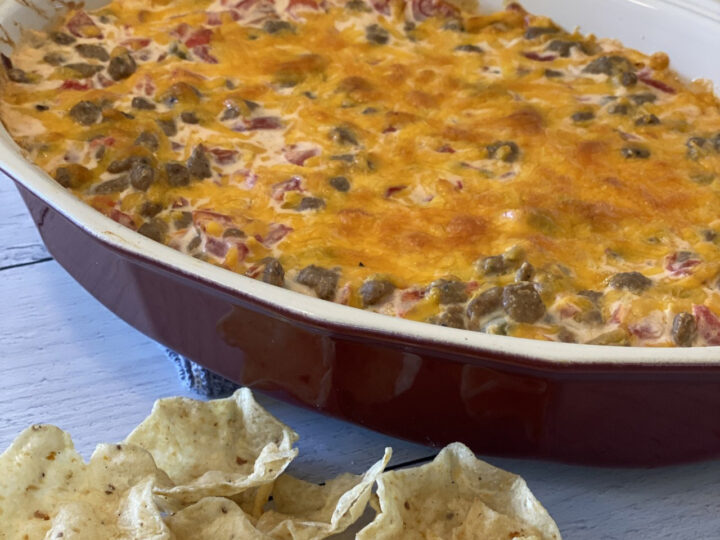
Sausage Cheese Dip
However you serve this dip, it's great to have in your appetizer collection!
Ingredients
- 1 (8 oz) block 1/3 less fat cream cheese
- 1 package Jimmy Dean Turkey Sausage Crumbles
- 1 can Rotel brand tomatoes and green chiles, undrained
- 3/4 cup reduced fat sharp cheddar cheese
Instructions
- Preheat oven to 350 degrees.
- In a medium sized saucepan over medium heat, combine all ingredients. Stir gently until cream cheese and cheddar cheese melt.
- Transfer mixture to 1 quart baking dish.
- Top with some extra shredded cheese if desired.
- Bake for about 15 minutes, until bubbly.
- Broil for a minute or two if you want cheese on top to brown slightly.
- Serve warm with tortilla chips or cut up veggies.
Adding Some Greens To Your Christmas Dinner
When I’m planning my Christmas Dinner menu, I do like to include some kind of salad. I know, it’s not what you usually think of when it comes to a holiday meal… but this one may change your mind.
I love this raspberry and spinach salad because it’s red and green and it looks pretty! Plus, there’s always that person who eats on the lighter side and doesn’t like to indulge in the decadence of creamy, cheesy, carb-filled side dishes. So, salad it is!
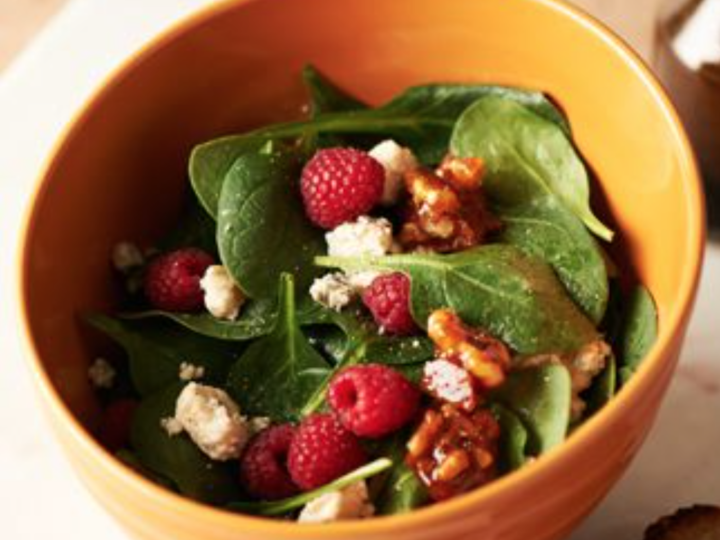
Raspberry Blue Cheese Spinach Salad
Filled with crunch and flavor, this spinach salad is a great addition to any meal.
Ingredients
- 1 (10-oz) bag baby spinach
- 2 cups fresh raspberries
- 1 cup Gorgonzola or another creamy Blue cheese, crumbled
- 1 cup glazed walnuts
- 6 Tbsp aged balsamic vinegar
- 3 Tbsp olive oil
- Kosher salt and white pepper to taste
Instructions
- Combine the spinach, raspberries, crumbled Gorgonzola, and candied walnuts in a salad bowl.
- In a small bowl, whisk together the vinegar, honey, olive oil, salt, and pepper until well blended.
- Add the vinaigrette to the salad and toss well. Drizzle any additional vinaigrette on the plates. Serve immediately.
My Favorite Side Dishes For A Christmas Ham
This pineapple casserole bake is a beloved favorite in my husband’s family. It is the absolute best side dish with ham. I mean, THE BEST.
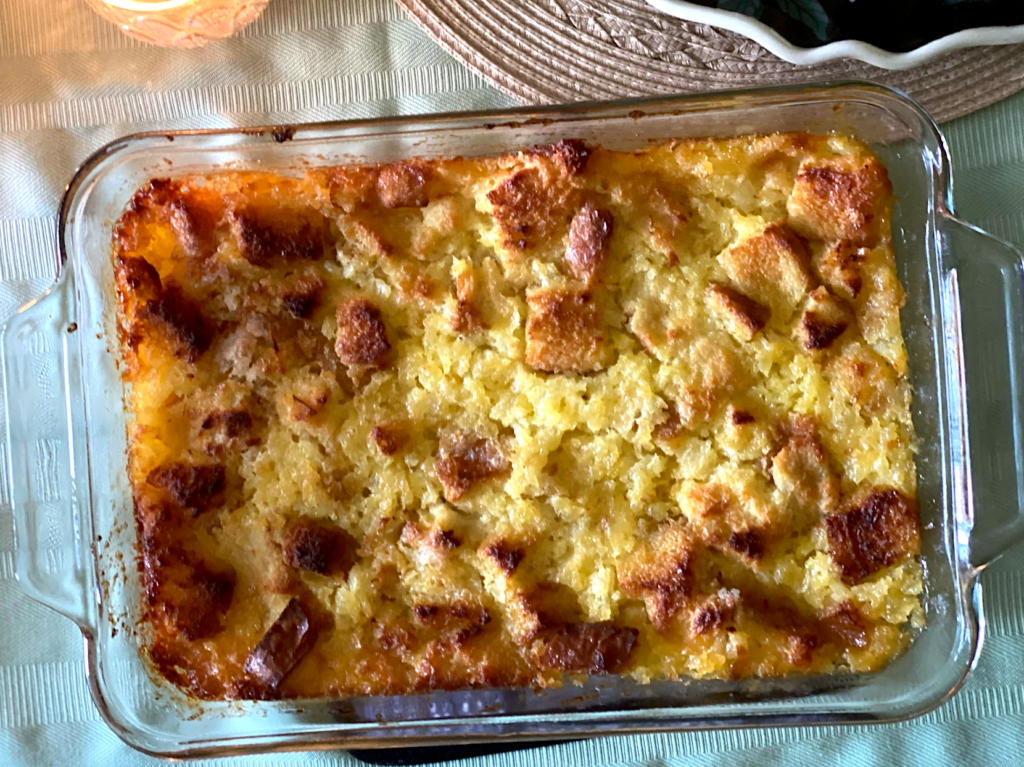
I think you’ll love how easy pineapple bake is to make. I like to serve it at room temperature and you can definitely make it the night before and just slightly warm the day you want to serve it.
It’s actually quite good cold if there are any leftovers.
So I’ve been told 🙂
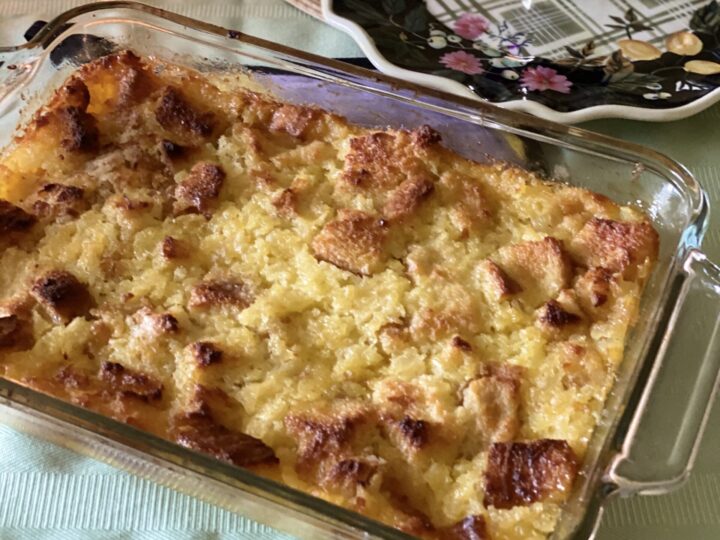
Pineapple Casserole
This is my husband's family's recipe and boy is it tasty! It's packed with crushed pineapple and it's great for brunch or dessert.
Ingredients
- 1 cup butter
- 2 cups sugar
- 8 eggs
- 10 slices white bread, cubed
- 2 (20-oz) cans crushed pineapple, with juice
Instructions
- Preheat the oven to 350°F. Lightly butter a 9" x 13" or 3-qt casserole dish.
- Cream the butter and sugar together by hand or with a stand mixer. Add the eggs in one at a time. Use a spatula to fold in the bread and pineapple (plus the juice). Stir the mixture gently until just incorporated and then pour the mixture into the prepared casserole dish.
- Bake for 1 hour until it is light brown and bubbly. Let the casserole cool for about 20 minutes before serving.
Notes
You can double this one and save the leftovers in the fridge. It's even delicious chilled.
Here’s another side dish that deserves an award.
It’s usually my featured side dish for Thanksgiving dinner, but this cranberry apple bake is also really tasty as a side dish with ham.
It’s probably one of my most popular recipes… and as a side note, if you’re watching your sugar intake, I’ve reduced the sugar to 1 cup for the recipe and it comes out just fine.
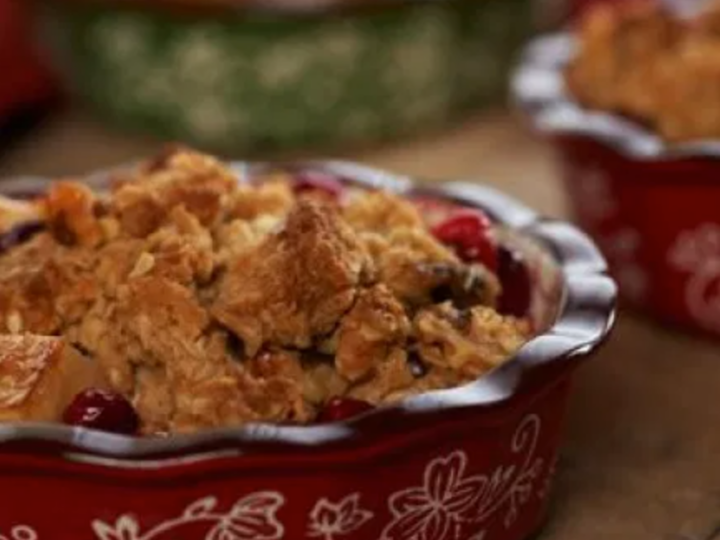
Cranberry Apple Bake
If you’re looking for a new cranberry side dish, then you’re going to love this recipe!
Ingredients
- 3 cups whole fresh cranberries
- 3 cups fresh baking apples, peeled and diced
- 1 & 1/2 cups sugar*
- 1/4 lb butter
- 1/3 cup brown sugar
- 1 & 1/3 cups quick-cooking oatmeal
- 1 cup walnuts, chopped
Instructions
- Preheat the oven to 350°.
- Mix the cranberries, apples, and white sugar together a casserole dish.
- Melt the butter in a small saucepan. Remove the pan from the heat and add the brown sugar, oats, and walnuts. Mix until combined and then pour the mixture on top of the cranberries and apples. Distribute evenly.
- Bake for about 1 hour, or until bubbly and golden brown
Notes
*I’ve seen a few comment from people that 1 1/2 cups of sugar was too much for them and therefore didn’t try the recipe. I went back to the kitchen and tried making this with just 1 cup of sugar and it turned out just great! My only recommendation would be that if you cut the sugar to 1 cup, you use a slightly sweeter apple, like the Jonagold or Braeburn. I also recently tried a new apple called the Cosmic Crisp, and they were wonderful in this recipe.
This zucchini recipe is from my childhood. It doesn’t photograph that well, but once you taste it, who cares about the picture!
The slices of zucchini and tomato are topped with a spice mixture. When combined with butter, onions, and parmesan cheese, it creates the most flavorful dish.
If you need a vegetable for a side dish, I highly recommend this recipe (and outside of the holiday season, it’s my favorite go-to for a side when I’m making roasted chicken!).
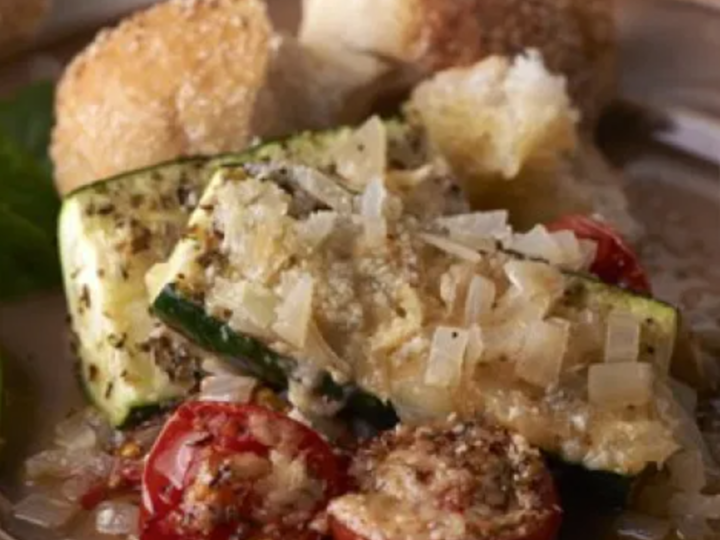
Jill's Favorite Zucchini
This is one of my favorite recipes from childhood. Can you believe it? A vegetable recipe?
Ingredients
- 3/4 stick of butter, melted
- 1 small onion, diced
- 4 medium zucchinis, sliced in 1/2 lengthwise and then in half in width (each zucchini should give you four pieces)
- 3 Roma tomatoes, cut in half lengthwise
- 2 tsp sugar
- 1 tsp salt
- 1/4 tsp oregano
- 1/8 tsp pepper
- 2 tbsp Parmesan cheese, finely grated
Instructions
- Preheat oven to 350°.
- Place melted butter in 11″ x 7″ baking dish. Sprinkle diced onion over butter. Add zucchini and tomato wedges in rows, cut side up.
- Mix dry ingredients together (except cheese) and evenly sprinkle over vegetables.
- Bake for about 45-50 minutes, drizzling vegetables with the melted-butter juice at the bottom of the pan as it bakes. (I usually do this after about 30 minutes.)
- Sprinkle parmesan cheese over vegetables ten minutes before it’s finished baking.
Desserts I’m Making For Christmas
Above all else, I suppose it’s the dessert that is my favorite “course” to make for Christmas Dinner.
I love to put out a dessert table that has a little bit of everything, and these are the recipes I’m making this year.
If you’re a chocolate lover, meet your new best friend.
My easy chocolate lovers pie is smooth and silky and a slice of heaven. It definitely wins over the chocolate fanatics at your celebration.
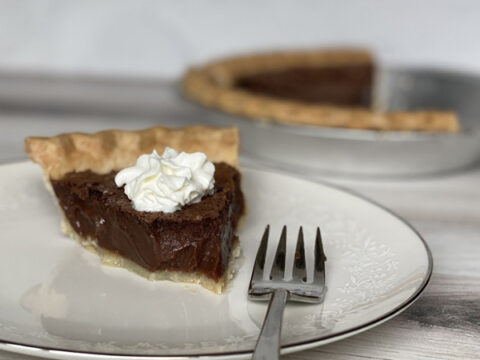
Chocolate Lovers Pie
I’m excited for you to try this simple chocolate pie recipe. I’m always surprised at how many people tell me they’ve never had a chocolate pie. Oh….the surprise that awaits!
Ingredients
- 1 & 1/4 cup sugar
- 3 & 1/2 tbsp unsweetened baking cocoa powder
- 2 eggs
- 1/4 cup butter, melted
- 1 tsp vanilla
- 1 (5 oz) can evaporated milk
- 1 frozen pie crust (9 or 10 inches is fine)
Instructions
- Preheat oven to 350. There is no need to prebake your frozen pie crust.
- In medium bowl, mix the sugar and the cocoa powder together.
- Add the eggs and mix. Then add butter, vanilla and evaporated milk. Mix together well.
- Pour chocolate mixture into pie shell.
- Bake for about 55 minutes. Check to make sure pie crust doesn’t get too brown while baking. You may need to add a pie shield or foil to protect pie edges.
- Pie should be fairly set. There may be a subtle jiggle (not overly so). Pie continues to cook a bit once removed from oven.
- Let cool then refrigerate before serving. Store in refrigerator.
On the other end of the flavor and taste spectrum are the lemon lovers. You know them. They want something “refreshing” for dessert.
Well, these lemon bars will give them that citrus tang they love, with a buttery shortbread crust and lots of lemony curd in the center.
I’ve been making these lemon bars for over 30 years. They’re one of those treats my friends request when I offer to bring dessert.
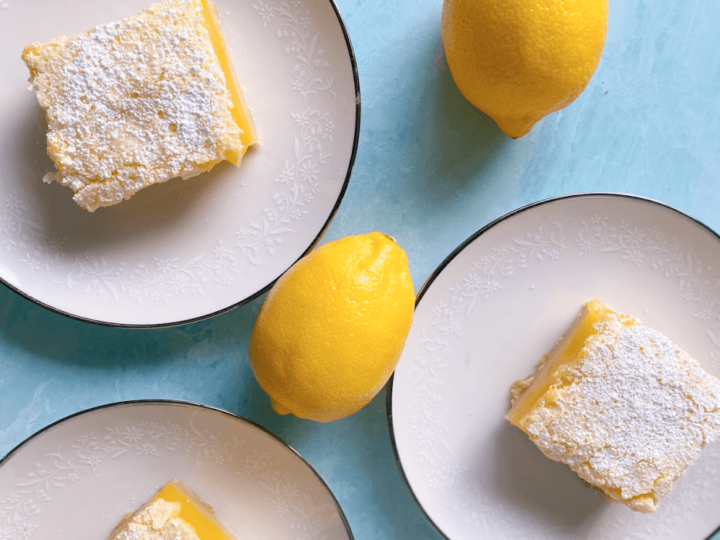
Best Ever Lemon Squares
In my opinion, you can’t go wrong with a family-friendly dessert like this. These lemon squares a little different from other recipes out there.
Ingredients
- 2 1/2 cups all-purpose flour, divided
- 1 cup (2 sticks) butter or margarine, softened
- 1 cup confectioners’ sugar, plus extra for topping
- 2 cups granulated sugar
- 4 eggs
- 1/2 cup lemon juice
- 1 teaspoon lemon extract
Instructions
- Preheat over to 350°.
- In a medium bowl, combine 2 cups flour, the butter and the confectioners’ sugar. Mix until crumbly.
- Press into the bottom of a 9x13 baking dish to form a crust.
- Bake for 15 minutes.
- In a large bowl, with an electric beater on medium speed, beat the remaining 1/2 cup flour, the granulated sugar, eggs, lemon juice and lemon extract until well blended.
- Pour over the hot crust.
- Bake for 25-30 minutes, or until set. Keep an eye in the final minutes that these don’t start to brown… it means the curd has cooked a bit too long.
- Allow to cool, then cut into squares.
- Dust with extra confectioners’ sugar and serve.
Notes
*If you want these bars to have a thicker crust, you can also bake these in an 11×8 pan. Baking time should stay about the same.
And what would Christmas be without snowball cookies?
These snowball cookies are tender, buttery, and filled with chopped pecans. This is my grandmother’s recipe… she used to tell me that her version of these cookies was always better than others. The trick is that the powdered sugar is incorporated into the dough as well as on the outside.
I don’t know if that’s true… but you know, Grandma always knows best.
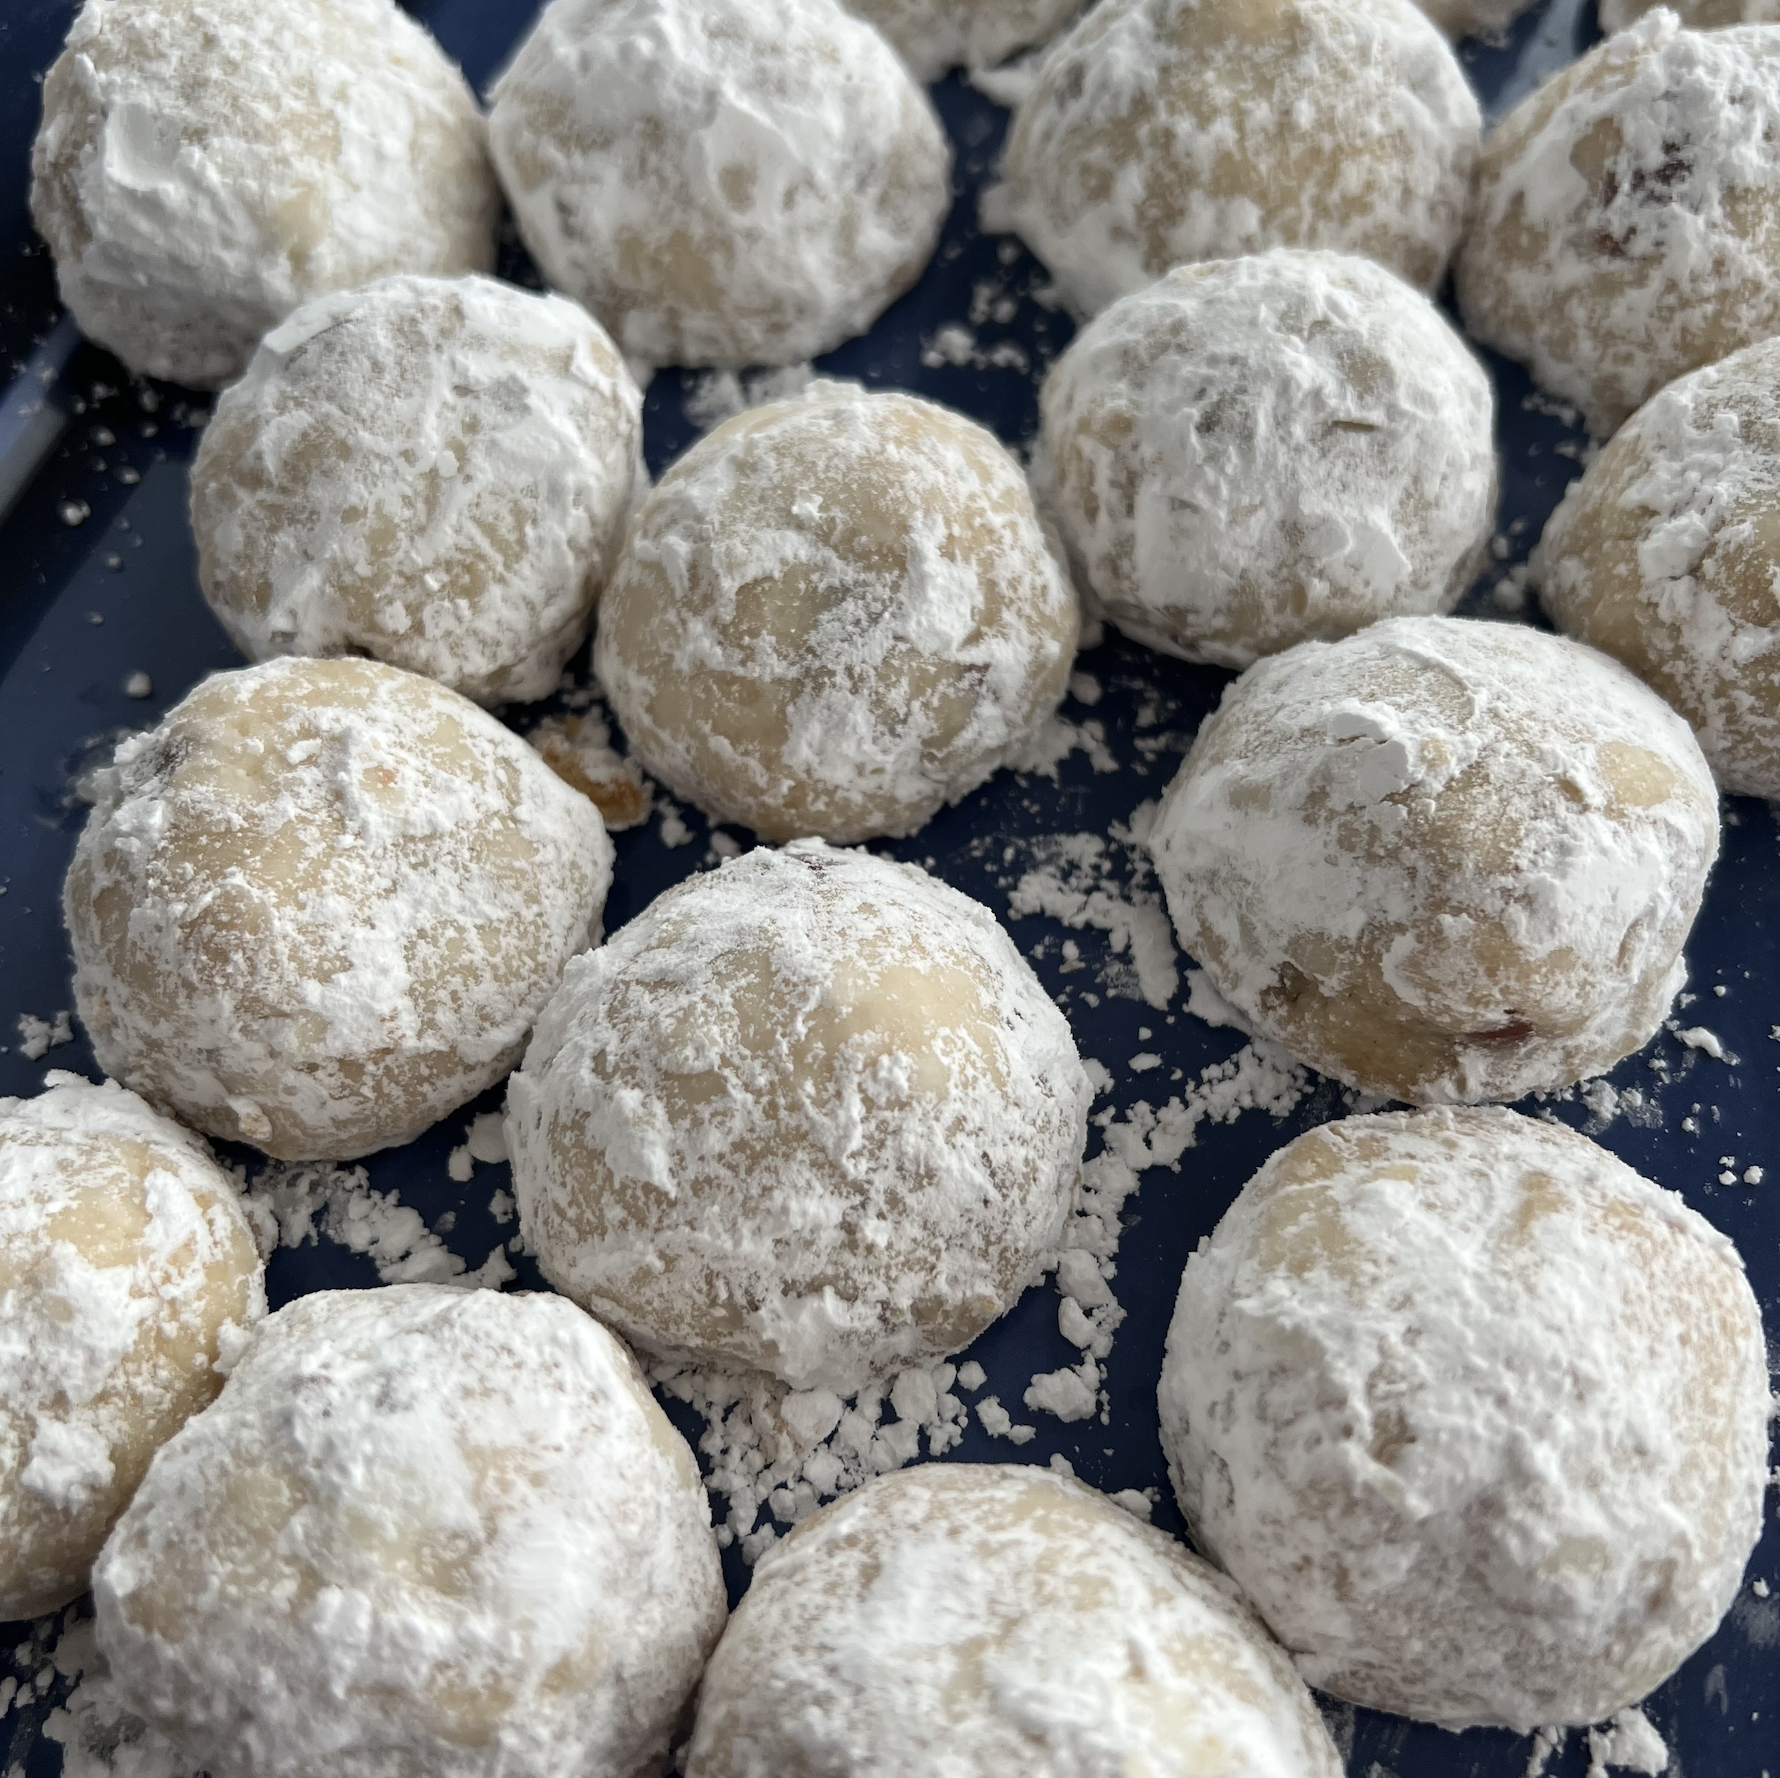
Snowball Cookies
These cookies are known by a lot of names….tea cookies, wedding cookies, butter cookies. And there are as many recipes for this cookie as their names!
Ingredients
- 1/2 cup butter, softened
- 1/2 cup shortening
- 1 tsp vanilla
- 2 cups flour
- 1 cup chopped pecans
- 6 Tbsp powdered sugar + extra for finishing
Instructions
- Preheat the oven to 375°.
- Cream together the butter, shortening and vanilla. Stir in the flour, nuts and powdered sugar and mix well.
- Shape the dough into balls—my grandma always said, “smaller than a walnut, bigger than a cherry!”
- Place the cookies on an ungreased cookie sheet and bake for 10 minutes, or until the bottom of the cookies become light golden brown. Be sure to watch them carefully, as these can burn quite easily.
- Remove the cookie sheet from the oven and let cool slightly, just until the cookies can be handled.
- Roll them in the extra powdered sugar while they’re still warm.
And who is going to resist a little square of fudge on Christmas day? It’s as much of the holiday season as any other food.
The cookies and cream fudge recipe I make was actually shared with me by my friend, Jill Ditmire.
We met as young reporters in West Lafayette, Indiana. Jill was a foodie like me and even became a finalist in the Pillsbury Bake-Off!
She passed away unexpectedly this year and I’m not sure I’ve fully processed that. She was like a fun, hip, big sister to me and I miss my friend.
So of course, this fudge will be on my Christmas Dinner table for the rest of my days, in honor of her.
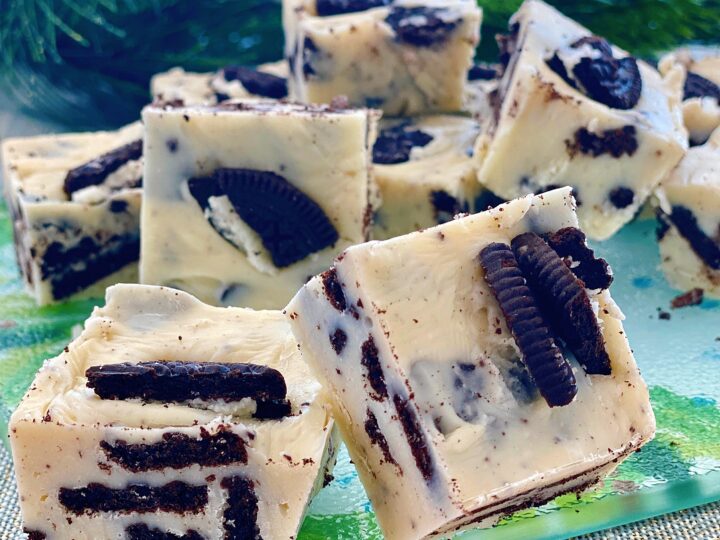
Cookies and Cream Fudge
I love making this recipe because it’s always a hit with kids and takes very little time. It’s a great homemade gift of food during the holidays, too.
Ingredients
- 1 (12-oz) bag white chocolate chips
- 2/3 cup sweetened condensed milk
- 1 tsp vanilla
- 2 cups Oreos, crushed
Instructions
- Grease an 8” x 8” square pan with butter.
- Melt the chips and milk in a medium-size saucepan over low heat.
- Remove the pan from the heat and add the vanilla and crushed cookies.
- Spread the mixture in the prepared pan and chill.
- Cut into small squares before serving.
Christmas Dinner Wrap Up
Well… that’s quite a full menu!
Now that my kids are a bit older, it’s really fun to prepare these family holiday meals together.
While I miss the days when they were younger and had such anticipation for Santa, I do enjoy these “older” years where we can hang out together and have fun in the kitchen getting ready for the big meal.
And one more note about the Berkwood Farms collection.
If you happen to love a big Christmas morning breakfast, you might be interested in the Berkwood Farms Breakfast Extravaganza that I curated just for you! (Let’s just say there are 4 kinds of bacon, along with sausages, and cheddar pork patties!) It makes a great gift too (and as long as you order by 12/13, it will be shipped in time for Christmas).
Check out the Berkwood Farms Food Collection HERE.
You’ll have to let me know if you try any of my recipes for your Christmas Dinner this year.
Wishing you a delicious holiday season,
Jill